TB: Archiving IMAP
Dear Helpers,
I try to ask my question as accurately as possible, I hope my problem becomes clear.
I use a variety of large email mailboxes in TB. Some of them as IMAP.
Since my server space is limited, I want to get the old emails from the server and archive them on disk (and only there). Unfortunately, I haven't found the right settings yet, because either TB suggests an online archive (i.e. on the server) or, when I go into the account settings, I can only select "Local Folders" at best, but no archive path belonging to the particular account. (My understanding is that Local Folders is a collection folder).
What I want to achieve looks something like this.
Account 1 (IMAP, Server based)
- Inbox
- Outbox
- Sent
Archive 1 (Local on my hard disk)
- Inbox
- Outbox
- Sent
Account 2 (IMAP, server-based)
- Inbox
- Outbox
- Sent
Archive 2 (Local on my hard disk)
- Inbox
- Outbox
- Sent
etc...
Could you please show me step by step the way how to set TB to get the desired result.
Thanks in advance for your advice.
All Replies (1)
You use 'Local Folders' mail account. It is a special mail account designed to store emails outside of any mail account for all kinds of purposes, but for people using Imap accounts, it is the place to store emails when you need to create space on the server. It is not just a 'collecting' account. People with POP accounts can set up as deferred accounts and use Local Folders as a 'Global Inbox'. But it is an account where you can store emails on your computer and they are independent of any server.
In 'Local Folders' account: Create a folder for account 1 emails eg: Account1 You can create more folders as subfolders to organise emails, but you are not going to need an Inbox because an Inbox is for new incoming unprocessed mail, not old archive emails. But if you really do want to use 'Inbox' then name it 'Old Inbox'. So you may already have, Family, Friends, Hobbies, etc as folders in the Imap account where you organise emails. Create the same in 'Local Folders'.
Example: > Local Folders > > Account 1 name > > > Old Inbox > > > Family > > > Friends > > > Bills > > > Old Sent > > Account 2 name > > > Business > > > Orders > > > Old Sent
Then make sure you have downloaded full copies and not just headers into that imap account.
Check settings:
- Right click on imap mail account name in Folder Pane and select 'Settings'
- Select 'Synchronisation & Storage'
- Select checkbox 'keep messages in all folders for this account on this computer.....'
- click on 'Advanced' button
- Make sure all your folders and subfolders have been selected - checkbox is selected to download full copies.
- click on OK
- Select 'Synchronise all messages locally regardless of age'
- All check same settings for the other Imap account whilst in Account Settings.
- Close 'Account Settings' tab
Now to check everything is up to date.
- Menu icon > File > Offline > Download/Sync Now
- Select checkbox 'Mail Messages'
- Select checkbox 'Work offline once download and/or synchronisation is complete'
You need to select the option for working offline because you do not want to have a load of synchronisation going on when dealing with mass copying etc of emails. The 'Select' button is useful if you want to check what is selected.
- click on 'OK'
Let Thunderbird do all the checks and then once it is in 'Offline' mode do the following: Select an imap folder and make sure the sort order has oldest date at top as it is easier to select old emails. Select/highlight batches of oldest emails Right click on highlighted batches and select 'Copy to' and choose the desired pre-created folder in 'Local Folders'. I say 'Copy to' because if something goes quiffy then you have not lost the originals. If all copied ok, then delete the original highlighted emails from the imap folder. Repeat until you have got copies of all required emails from all imap folders emails into 'Local Folders'. Note if you can read emails in Offline mode then you have good copies. So the odd random check may be useful.
Then do the same for the second account.
Backup now: Once all of this has been done, I would strongly recommend you create a backup.
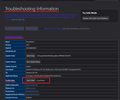
- Menu app icon > Help > TRoubleshooting Information
- Under 'Application Basics' - about 8th in list is 'Profile folders' - click on 'Open Folder'
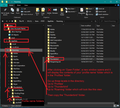
A new window opens showing the contents of the profile name folder.
- Exit Thunderbird now this is important.
- Go up the directory three levels until you are in the 'Roaming' folder - copy the 'Thunderbird' folder to an external drive.
I've included a few images as guide.


